Workout and Maintain Hairstyle – Best $4 I Ever Spent
I have found the best hair product ever!!! I was struggling with keeping my hairstyle after working out. This was particularly difficult when I decided to wear my hair straight. I don’t straighten often, but when I did, I couldn’t exercise in order to keep the style. I knew that there had to be a solution. I researched and tried many things. I wrapped my hair, put it in a tight ponytail, wore a bun, wore a headband, wore a bandanna. You name it, I tried it. But nothing seemed to work.
A few weeks ago while surfing online, I came across some message board where someone mentioned this mesh cap. I didn’t believe that this could work, but I figured it couldn’t hurt to try. I had just been to the salon and was sporting the straight look. I wasn’t exercising and the guilt was killing me, so I made the purchase.
I waited until I was ready to give up the straight look before putting this to use. I was about 3 days into the hairstyle when I tried this. I wrapped my hair tight and made sure that none of my hair was touching my skin. I did a session of TurboFire and if anyone has tried it, the routine is very intense and I was sweating profusely after. I was convinced that my hair was a gonner. WRONG! I took down my hair and, although it wasn’t as straight as when I wrapped it (turns out I didn’t spend enough time making sure the back of my hair wasn’t touching my skin), my hair was basically still straight. I wrapped my hair that evening, sprayed some oil sheen on it, and tightly wrapped my stretchy silk scarf. The next morning, my hair was perfect! I wore the style for 3 more days and exercised once more. When I decided to wash it out, my hair was still straight. The only reason I couldn’t keep the style was my hair badly needed a wash!
Miracle product. No more excuses. New hairstyle no longer means no exercise!! It also works for those with relaxed hair.
Protective Style #2
So I decided to go with the messy bun this week. It didn’t work out so well. Although I felt quite fine today, I constantly received questions about whether or not I was sick or comments saying I looked tired. Being that the only thing that changed was my hairstyle, I am choking this up as a loss. Being that I am practicing full hair disclosure, I am still posting the pics. I am still thinking about what will happen tomorrow. Maybe I can do something to jazz this up some.
List of Protective Styles
Here is a list of great protective styles. I found it on LHCF and thought it would be great to share as I am taking on this challenge!
SLEEK & SIMPLE (for long hair, some for short/med hair):
– Bun
– Bun w/ Chopsticks
– Bunned pigtails
– Chignon (http://z.about.com/d/beauty/1/0/f/E/chignon7.JPG)
– French Roll/Twist
– Braided Coil Updo (http://www.hairstylescut.com/articles/holiday-updo.htm – scroll to Beyonce)
– Roller/Flexirod/Curlformer set & Clip up the hair
– Flamenco (http://www.longlocks.com/flamenco.gif, http://www.longlocks.com/hairstyles.htm)
– Elegant Gibson (http://www.longlocks.com/elegantgibson.gif,http://www.longlocks.com/hairstyles.htm)
SINGLE-TWISTING IT:
– Bantu Knots (http://images.inmagine.com/168nwm/rubberball/rbv013/rbv0130053.jpg)
– Finger / Comb Coils (for short natural hair)(http://www.naani.com/contents/media/dreamypisces029.jpg,http://www.naani.com/models/photos/a0/98/66/a098662b826cd94.jpeg)
DOUBLE-TWISTING IT:
– Twisted Ponytail
– Twisted Ponytail into Bun
– Chunky Twists
– Tiny Twists
– Flat Twists (http://www.aolcdn.com/aolnews_photos/0d/07/20050426160009990011,http://i50.photobucket.com/albums/f323/phillyflower/DSC01452.jpg)
– Senegalese Twists (http://www.braidsinc.com/gallery/senegalese1.JPG)
– Kinky Twists
– Spring Twists
– Gypsy Twists (scroll down: http://www.khamitkinks.com/twists_locs.html)
– Baby Curl Twists (scroll down: http://www.khamitkinks.com/twists_locs.html)
– Loc Extensions (http://i222.photobucket.com/albums/dd85/mushiyasmith/0150-921-davadreadupdo.jpg)
BRAIDING IT:
– Single Braided Ponytail
– Single Braided Ponytail into Bun
– Double Braided Bun (http://www.longlocks.com/hairstyles.htm)
– Box Braids (w/ real hair)
– Box Braids (w/ extensions)
– Individual Braids (extensions)
– Micros (not too tight though)
– Cornrows (w/ real hair)
– Cornrows (w/ extensions)
– Plaits
– One French Braid
– Two French Braids
– French Tuck (http://www.longlocks.com/hairstyles.htm)
– English/Dutch Braids (http://www.longlocks.com/how-to-braid-hair.htm,http://www.dreamweaverbraiding.com/Braiding_Tips.htm)
– French/English/Dutch Braid(s) (w/ extensions)
– Victorian (http://www.longlocks.com/hairstyles.htm)
– Edwardian Braid (http://www.longlocks.com/hairstyles.htm)
– More braided styles: http://www.dreamweaverbraiding.com/Braiding_Tips.htm
MIX N MATCH:
– Cornrows in front; Twists in back
– Cornrows in front; Box Braids in back
– Cornrows in front; Bun in back
– Flat Twists in front; Twists in back
– Flat Twists in front; Box Braids in back
– Flat Twists in front; Bun in back
– Bantu Knots in front; Twists in back
– Bantu Knots in front; Box Braids in back
– Bantu Knots in front; Bun back
– Braids into Bantu Knots (http://www.worldofbraids.com/upload/page_files/58.jpg)
– Twists into Bantu Knots
COVER IT UP:
– Cornrows under Wig
– Weave / Sew-in
– Micros / Sew-in Combo
– Lace Front / Lace Wig
– Phony pony
– Phony puff
– Cornrows under HeadWrap (http://cornrows.co.uk/patterns/wrap01d.jpg)
– Bun under HeadWrap
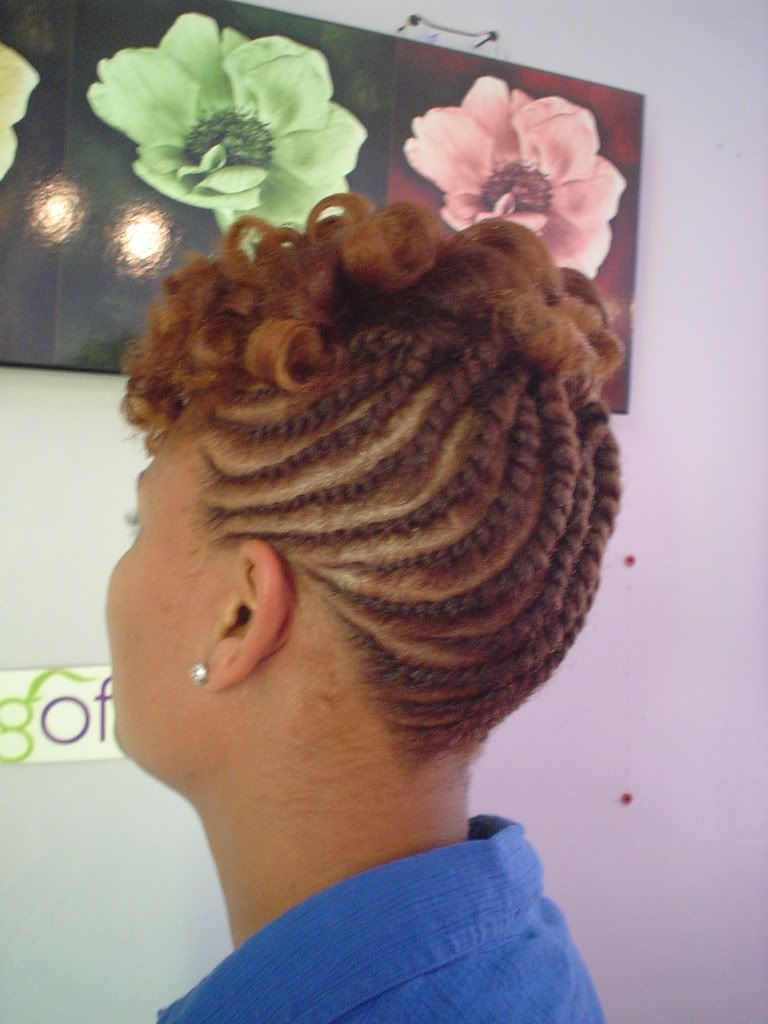
Protective Style #1a
So towards the end of the week I did begin to have that overwhelming urge to wear my hair out. I was really missing my curls which have been housed up in this bun for days now. I am truly dedicated to this challenge so I decided to find a compromise. The answer I found was BANGS!!! My hair is too long for real bangs and I refuse to cut, so I decided to part the very front of my hair, wet and moisturize with oil, and braid it into two small braids. I took this out in the morning for a nice wavy curl and set them to the side for side bangs. This partially satisfied me. However, the curls came out so nice I continue to wonder what would happen if I did my entire head. There will be time for that after this challenge 🙂

Protective Style #1
 |
 |
A straight phony pony is what I decided to use for my first week of protective styling. This is a Milky Way drawstring ponytail that I purchased from the beauty supply store for $9.99. It can be used on long or medium length hair. As long as you can pull your hair into a ponytail, this will work. I washed and conditioned my hair and used Eco Styler Gel to create a high ponytail with my hair. I tied my hair down with a silk wrap in order to get the hair to lay as flat as possible. In the morning, I placed the ponytail over my own ponytail and pulled the drawstring. I continue to add a small amount of gel and wrap with a silk wrap each evening before bed.
Today is my day to wet my hair and place the ponytail again. I am trying to moisturize every 2-3 days. Avocado oil is on deck as my sealer this week. Aussie Conditioner will be used as my co-wash. No shampoo needed since I am only shampooing once a week.
I haven’t been drinking as much water, so I will try harder to get that in the remainder of this week. So far, I miss my hair, but I haven’t experienced any overwhelming urge to wear it out.
Healthy Hair – Growth Challenge
So there is 113 days until the 1st day of Summer. I don’t know about others, but Summer brings extra stress to my hair. I swim so the chlorine and the lack of time to spend on my hair (due to being out and about) causes problems. Being that I just finished with the blond fiasco, I am not looking forward to dealing with unhealthy hair again. Also, having 2 inches cut set me back in my hair growth challenge.
Having said all of that, I am going on a 113 day challenge. This will be extremely difficult for me as I am in loooove with my hair. I like different styles and I like for it to be wild and loose! To tackle the different styles, I will be trying all different types of buns, phony ponies, and any other protective styles I find through research and my own creativity. For wild and loose, I will allow myself one weekend a month with loose hair. I know I wouldn’t survive cold turkey 🙂
My action plan is as follows:
- Protected styles worn throughout the 113 days. Ends will be hidden in all protective styles. My hair will only be worn out on special occasions which will be limited to 1 weekend out of a month.
- Weekly shampoo with a sulfate-free shampoo (most shampoos can be drying).
- Weekly deep treatments with olive oil, honey, and conditioner.
- No direct heat applied to hair except for the 8 week salon visit for a trim.
- I will measure hair every 4 weeks to track progress. This will be done on stretched hair from a braid or twist out.
- Moisture applied to hair every 3 days. Moisture will be sealed with Avocado, Olive, or Coconut oil.
- Follow a healthy diet and exercise program (P90x/Turbo Fire Challenge)
- Drink 8 glasses of water daily.
Starting Length – front/middle 9.5 inches, back/nape 6 inches
Who’s with me?? Let’s get this started. We can do it!
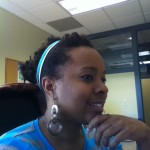
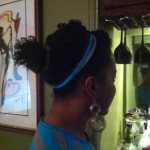
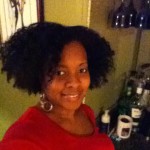
Bad Hair = Bad Me
So I am back!!! I was gone for a while because I wasn’t feeling so great about my hair. I didn’t think I could help others when I was in such a bad state!!! I had been dying my hair blond since April of 2010. It looked great at first but then I noticed that it was extremely dry and broken off. Additionally, my hair was different colors since trying to get my roots died the same shade blond every 8 weeks was a major task.
I was so scared that I would have to get all of my hair cut off that I refused to visit a salon. After some time, things were so bad that I forced myself to make an appointment. I had to go to a same day salon (Hair Cuttery), so I wouldn’t talk myself out of what I thought had to be done. (SB: I loved the salon and will be going back every 8 weeks for a trim). I prepared myself for yet another Big Chop (I was just above APL). When I sat in the chair, I immediately told the beautician my issues. To my surprise, she laughed. She told me that blond die tends to be drying and will wreck havoc on someone’s hair, but all I needed was about a 2 inch trim. I was sooo relieved. I proceeded to go back to my dark brown original color (the end result was a little darker then my natural color) and I will not be going blond anytime soon…if ever.
WHEW! I feel much better about myself and I can go back to my old hobby of caring for natural hair. My hair looks and feels great which means I look and feel great! Look out for more blogging in the upcoming months as I get back on track with my healthy hair regimen.
Below are some pics of my new hair. I’m lovin it. Photos were taken with a phone cam. I promise to take better pics with my nixon soon 🙂
-

- curyl fro
-

- straight hair
-
- braid out
-

- twist out
Mini Two-Strand Twists

Mini Two-Strand Twists
Mini Two Strand Twist is my ultimate protective style. I love this style. It takes me a while to do, but it lasts for up to 4 weeks! I don’t need to do anything to my hair during that time. It’s truly a shake and go style. I co-wash my hair about once a week and I spritz with a conditioner (V05 Moisture Milk or Suave Naturals), water, jojoba oil mix daily for moisture.
How to Create the Style
- I chose to blow dry my hair prior to starting. After washing my hair, I braid in four braids and let them air dry. Once dry, I use a heat protectant and I blow dry on low. This is not a required step. The style looks just as nice and lasts just as long if you don’t blow dry. I choose to blow dry in order to show the length.
- Use a rat tail comb and not worrying about parts, make sure you are taking just a small amount of hair at a time.
- Split the hair in to two sections and twist one section over the other. Keep doing this and twist the hair all the way down to the end. The twist should be a little smaller than the size of a straw when finished.
- I like to work with the front first. I twist starting at the hair line. I twist going towards the front. If you like a part in your hair, this is the best time to create it. Make sure you twist the entire front including the sides.
- Once I get to the middle of the head, I switch gears and begin working the very back. This means I end up with a big chunk in the middle that is undone. I like it this way because, if for some reason I can’t finish, I can always put the hair in a bun and it looks as though my entire head is done.
- I then work on the middle part. Twisting those to the back.
- Flip the front of the hair back when done and the style is complete.
- To get the ends to curl, I use my water, conditioner, jojoba oil spritz on the very ends and scrunch with my hands. Scrunching is done by cupping the ends of the hair and squeezing similar to an accordion.
How to Manage the Style
- Add a small amount of jojoba oil to the hair at night.
- Tie down the hair with a satin scarf or sleep on a satin pillow.
- In the morning spritz the hair with the water, conditioner, jojoba oil mix. Scrunch the ends.
- Co-wash weekly. I use V05 Moisture Milk or Suave Naturals for my co-wash.
How to Remove the Twists
- Start out by unraveling as many twists as you can by hand. Don’t worry about the ones that are really tangled.
- Get some cheap conditioner. I use Suave or V05 Moisture Milk. Wet the hair and add a generous amount of conditioner. I usually do this in the shower so I use the max amount of water and ensure that each section stays completely wet as I am detangling.
- Take a good size chunk. About 10-15 twists. Add more conditioner and take a DENMAN Brush and begin to brush out the twists. Start from the bottom and work the brush up to the top. A good amount of hair will be lost, but that is ok. Your hair has not been able to shed because it has been twisted for weeks. Shed hair is expected.
- Braid the section once complete and move on doing the same thing until the whole head is done.
- Deep condition the hair when complete.
What Are Protective Hair Styles?

Protective Style - Doughnut Bun
Protective styles are styles that keep your ends shielded from the various weather elements (wind, rain, snow, sun, etc.). These styles require no direct heat and no additional manipulation of the hair outside of the original styling. If done correctly, protective styling can to help retain moisture, prevent split ends and breakage, and cause less stress to the hair from constant combing, brushing, and styling. These styles are particularly useful for people with shoulder length hair. Once the hair is shoulder length, the ends of the hair tend to brush against clothing which causes a great deal of breakage.
There are many benefits to wearing protective styles. One major benefit is healthier, longer hair. Hair is healthier and can grow longer due to the fact that the hair is protected and not manipulated daily. Another benefit is the ability to spend less time on the hair on a daily basis. Protective styles usually require one styling day and the styles usually last anywhere from 1 to 4 weeks. True protective styles can also result in a reduction of acne that often results from hair and hair products coming in contact with the face. Lastly, some people just enjoy the look and the variety of protective styling options.
True protective styles keep the ends completely hidden. Examples of these styling options include:
• Buns
• Weaves
• Wigs
• Braid Extensions
• Phony Ponies
• Tucked styles
• Bantu Knots
Some consider low manipulation styles protective as well. While these are not truly protective styles because the ends are often exposed, they do require no direct heat and little to no manipulation which results in healthier hair and greater hair retention. These styling options include:
• Twists
• Twist outs, Braid outs, Bantu Knot outs
• Braids
• Coils
• Shrunken Fro
• Rollersets
• Pinned Up Styles
It is important to remember that even protective styles can cause damage if not done correctly. It is vital to be very careful whenever handling your hair, even if you are only handling it every so often. Never pull the hair and pay close attention when detangling. Many protective styles, such as twists will require extensive detangling when it’s time to remove them.
Also, while buns are considered the ultimate protective style, there are some things to take into consideration when choosing this style. First, consider the length of your hair. If your hair is a length that the ponytail holder will sit on the ends of your hair, buns may not be the best style until the hair grows out more. Secondly, hair needs a break even when in a bun. Switch up the style every so often. At least, switch the location of the bun. Breakage can result if the bun is worn in the same location every time.
Protective styles are fantastic styling options and promote healthier, longer hair. They look great, are easy to create, and give us a break from daily hair styling.
Sesame Street – I Love My Hair
I LOVE this video! I am so happy that Sesame Street has taken notice and decided to help our girls feel better about their hair. I definitely try hard to instill a love of hair in my daughter. I try to make hair time enjoyable. I allow her to choose different styles (many were shown in this video) and I make hair time a special time we spend together bonding and talking about different topics. Lately, she has been learning to read, so she reads to me while I finish her requested style. She loves to show off her finished hair to her dad and her brothers when she’s done! I work hard to ensure she remains in love with her hair in it’s natural state.
We watched this video together and the smile on her face drove home the fact that this video is special. I asked afterward if she loved her hair and I got a shy smile. My 2 year old son even enjoyed singing the song and wanted to see the video again and again. I was always a huge fan of Sesame Street, since I was a small child. Videos like this just serve to remind me the reason why I love them so. I think everyone should enjoy this video with the little girls in their lives. It wouldn’t hurt to share with some bigger girls as well 🙂
The Story Behind the Video
Joey Mazzarino, the head writer and a puppeteer at Sesame Street, wrote this song in response to his daughter. Joey and his wife have an adopted Ethiopian-born daughter named Segi. He noticed that she was beginning to experience hair issues (issues that most Black women can identify with).
“She was going through this phase where she really wanted like the long, blond hair. … She would look at Barbies and really want the hair.â€
Mazzarino decided he wanted to do something to help other young girls appreciate their beauty and embrace their differences. He wrote the song and, with the help of Sesame Street, created this adorable Muppet character. She showcases the variety of ways she can wear her hair while singing its praises and dancing.
“I just want kids to know their hair is beautiful,†Mazzarino said. “I just hope little kids, little girls see this and really feel positive and great about themselves.â€
Lyrics
Don’t need a trip to the beauty shop,
’cause I love what I got on top.
It’s curly and it’s brown and it’s right up there!
You know what I love? That’s right, my hair!
I really love my hair.
I love my hair. I love my hair.
There’s nothing else that can compare with my hair.
I love my hair, so I must declare:
I really, really, really love my hair.
Wear a clippy or in a bow
Or let it sit in an afro
My hair looks good in a cornrow
It does so many things you know, that’s why I let it grow
I love my hair, I love my hair
I love it and I have to share
I love my hair, I love my hair!
I want to make the world aware I love my hair.
I wear it up. I wear down. I wear it twisted all around.
I wear braids and pigtails too.
I love all the things my hair can do.
In barrettes or flying free, ever perfect tresses you’ll see
My hair is part of me, an awesome part of me
I really love my hair!
